[language-switcher]

How to Choose an Automated Injection Molding Machine?

Choosing an Automated Injection Molding machine is not simply a matter of selecting the fastest model. It is a process decision. The right machine must match the part, mold, material, production volume, and quality target.

John Bozzelli, a respected scientific molding educator, emphasizes a practical principle: “Consistency is the real goal of automation.” This idea matters on the factory floor. A machine may produce a perfect sample during testing, yet struggle after eight hours of cycling. Temperature drift, unstable feeding, poor mold alignment, or an undersized shot can quietly increase scrap. Small errors become expensive.

Start with the product requirements. Check the required clamp force, shot size, injection pressure, screw design, and mold dimensions. Consider the material’s sensitivity to moisture and shear. Engineering polymers may demand tighter temperature control than common polypropylene. A servo-electric machine can reduce energy use and improve repeatability, while a hydraulic model may offer strong performance and lower initial cost. Neither option is automatically best.

Look closely at automation compatibility. The machine should communicate reliably with robots, conveyors, mold-temperature controllers, dryers, and inspection systems. Cycle time is important, but recovery time and maintenance access matter too. Ask for production data, not only brochure claims. Request a material trial with the actual mold.

Some choices remain imperfect. Energy savings may not justify a higher purchase price for low-volume work. A highly automated cell can also create new training needs. The best decision balances measurable performance with practical factory experience, documented service support, and room for future production changes.
How to Choose an Automated Injection Molding Machine?

Define Production Needs and Machine Requirements

Choosing an automated injection molding machine starts with production facts, not catalog features. Define annual volume, part weight, resin type, cavity count, cycle time, and required uptime. Record the largest and smallest parts separately. They expose different constraints. A 2024 MarketsandMarkets report estimates continued growth in the global injection molding machine market, increasing pressure to improve capacity and efficiency. Growth alone, however, does not justify buying the largest machine.

Calculate clamp force from projected part area, cavity pressure, and safety margin. Confirm shot size, mold thickness, daylight, tie-bar spacing, and ejection stroke. Keep the normal shot between 30% and 80% of barrel capacity when possible. This supports stable plasticizing and reduces residence-time problems. Automation also needs definition: part removal, sprue separation, vision inspection, packaging, and material drying may require different interfaces. Small details matter.

Energy should be measured per molded part, not only by installed power. The U.S. Department of Energy reports that motor-driven systems can consume more than 70% of industrial electricity. Therefore, compare kWh per cycle under realistic loads. Request process data, alarm history, maintenance access, and acceptance-test criteria. ISO 20430:2020 provides relevant safety requirements for injection molding machines. I have seen teams overestimate future demand and under-specify mold access. That mistake is expensive. A careful spreadsheet is useful, but it is not a substitute for a mold trial.

Match Machine Type to Material, Part Size, and Geometry

How to Choose an Automated Injection Molding Machine?

Match the machine to the material before comparing automation features. Standard thermoplastics often run well on general-purpose machines with stable temperature control. Engineering resins may require higher barrel temperatures, stronger screw designs, and improved drying systems. Glass-filled materials deserve extra attention because they can accelerate screw and barrel wear. I have seen production teams underestimate this detail. The machine worked, but maintenance costs rose quickly.

Part size determines more than the required clamp force. Calculate projected area, cavity pressure, and a practical safety margin. Then check the mold width, height, tie-bar spacing, and platen dimensions. A large machine is not automatically better. Excessive capacity can increase energy use and reduce molding efficiency. Shot size also matters. The planned shot should usually occupy a reasonable portion of the barrel’s rated capacity, not a tiny fraction. Small shots can suffer from longer material residence times. That can damage heat-sensitive polymers.

Geometry should guide injection speed, pressure, and control precision. Thin walls and long flow paths need fast, consistent filling. Deep ribs may require careful venting and reliable ejection. Large flat parts can need balanced filling to limit warpage. Electric systems often provide precise repeatability, while hydraulic systems may offer strong force for demanding molds. Hybrid designs can balance both needs. Still, these categories are not absolute. Mold trials, material data, and actual cycle measurements should influence the final choice. A spreadsheet helps, but it cannot reveal every filling problem. Test the process with real tooling whenever possible.

How to Choose an Automated Injection Molding Machine?

Match machine type to material, part size, and geometry

The ranges show representative clamping-force bands used for different molding applications. Electric machines are commonly selected for precision, repeatability, and clean processing; hydraulic or hybrid machines are often preferred for larger parts, high injection volumes, or demanding structural geometries. Final sizing should be verified using projected area, cavity pressure, material behavior, mold design, and an appropriate safety factor.

Evaluate Clamping, Injection, and Automation Specifications

How to Choose an Automated Injection Molding Machine?

Evaluate Clamping, Injection, and Automation Specifications

Start with the clamping system. Calculate the mold’s projected area, including runners, then compare it with the machine’s usable clamping force. A small safety margin helps prevent flash, but excessive force can increase mold wear. Check platen dimensions, tie-bar spacing, and mold thickness limits. These details matter when a tool fits on paper but cannot be installed comfortably. Keep clearance in mind.

The injection unit must match the material, shot size, and required part weight. Choose a shot capacity that uses roughly 30% to 80% of the barrel’s rated volume. Very small shots may create residence-time problems, while oversized barrels can reduce material consistency. Review injection speed, pressure, screw diameter, and temperature-control zones. Ask for actual test data, not only catalog values. I once focused too much on peak pressure and overlooked recovery time. That slowed the entire cell.

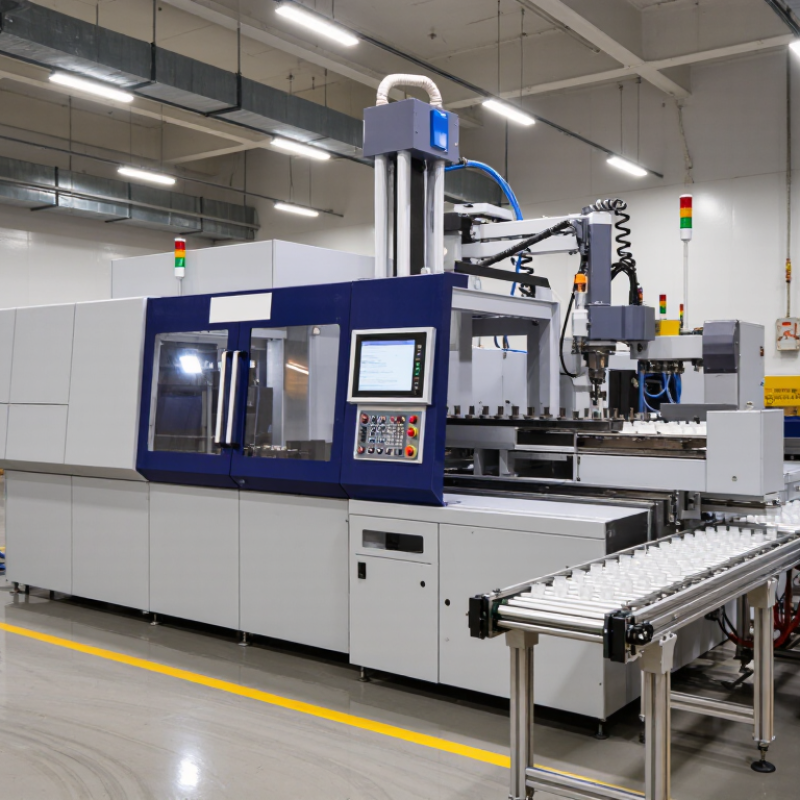
Automation specifications should describe the complete production cycle. Confirm robot payload, reach, repeatability, gripper design, and communication with the molding controller. The robot must remove parts without touching the mold or delaying cooling. Check safety doors, light curtains, interlocks, fault recovery, and manual override procedures. Also examine conveyor capacity, inspection sensors, and data recording. A short dry-cycle test can reveal awkward movements quickly. Do not ignore maintenance access. A technically impressive system may still frustrate operators if filters, lubrication points, or cables are difficult to reach. Production teams should review the layout before purchase. Their practical objections are sometimes inconvenient, but usually valuable.

Compare Energy Use, Controls, Safety, and Maintenance

Choosing an automated injection molding machine starts with measured energy use, not brochure claims. The IEA reports that motor-driven systems consume about 53% of global electricity. Hydraulic pumps therefore deserve close attention. Compare kWh per kilogram under the same resin, mold, cycle time, and cooling conditions. Variable-speed drives can reduce idle losses, but actual savings depend on settings and operator habits. EUROMAP 60.1 provides a useful framework for measuring injection-molding energy performance.

Controls should make production visible. Look for recipe control, cycle monitoring, alarm history, and exportable data. A clear screen showing pressure, temperature, and cycle deviation helps technicians react before defects spread. However, more software is not automatically better. Complex menus can slow a night-shift operator. Test the interface with real users, wearing gloves and standing beside the machine.

Safety must include guarded access, reliable interlocks, emergency stops, and controlled restart procedures. ISO 20430:2020 offers relevant safety requirements for injection-molding machinery. Maintenance is equally practical: inspect filters, lubrication points, cooling lines, heaters, and hydraulic leaks during scheduled checks. Condition monitoring may reveal rising pump temperature before failure. It is not perfect. Sensors can drift, and maintenance records can be incomplete. Ask for service intervals, spare-part availability, diagnostic access, and training requirements. A machine that saves energy but sits idle for two days is not efficient in practice.

Verify Supplier Support, Total Cost, and Future Scalability

How to Choose an Automated Injection Molding Machine?

Supplier support should be tested before the purchase order is signed. Ask for documented response times, technician coverage, spare-parts availability, and operator training. Request a factory acceptance test using your actual resin, mold, cycle time, and quality limits. Deloitte’s 2023 Smart Manufacturing and Operations Survey found that 86% of manufacturers expect smart manufacturing to drive competitiveness within five years. That expectation makes software support and data access important. A machine without reliable updates may become expensive equipment with outdated skills.

Purchase price is only one cost. Calculate energy use, mold changes, maintenance labor, rejected parts, downtime, and utilities over seven years. Grand View Research valued the global injection molding machine market at about USD 12.8 billion in 2023, with projected growth through 2030. Market growth does not guarantee your investment will pay back. Your material and cycle data must do that. A cheaper machine may need more manual adjustment. That can quietly erase its initial savings.

Scalability needs evidence, not promises. The International Federation of Robotics reported 4.28 million industrial robots operating worldwide in 2023. Check whether the machine supports robot interfaces, production monitoring, recipe control, and future auxiliary equipment. Confirm communication protocols and data ownership in writing. I would also test a second mold during evaluation. One successful trial is not enough. No spreadsheet predicts every stoppage. That uncomfortable gap deserves a contingency budget and a named support contact.

How to Choose an Automated Injection Molding Machine? — Verify Supplier Support, Total Cost, and Future Scalability
Evaluation Dimension What to Verify Practical Benchmark or Planning Data Lower-Support Offer Stronger-Support Offer Recommended Evidence Weight
Machine Fit Clamping force, shot size, mold dimensions, tie-bar spacing, platen size, and injection pressure. Select a machine that normally operates at approximately 70–90% of required clamping force and shot capacity, leaving operating margin for process variation. Capacity is quoted without a documented calculation based on the actual part and mold. Supplier provides a machine-selection calculation using projected area, material, mold weight, cycle conditions, and safety margin. Signed technical proposal, mold-layout review, and machine data sheet. 15%
Automation Readiness Robot interface, mold-protection signals, safety circuits, part-removal access, conveyor interface, and auxiliary-device communication. Confirm standardized I/O and communication signals before purchase; verify that the machine can support the intended robot, dryer, chiller, temperature controller, and quality-monitoring devices. Automation is treated as a future custom project with no defined interface list. Supplier supplies an interface matrix, safety concept, layout, and commissioning responsibility split. I/O list, electrical drawings, risk assessment, and factory-acceptance test checklist. 12%
Supplier Response Time Remote diagnostics, hotline coverage, spare-parts response, and escalation procedure. For critical production equipment, request written targets such as same-business-day remote response and a defined escalation path for unresolved faults. Support commitments are verbal or limited to general office hours. Service-level agreement includes response targets, remote access procedures, escalation contacts, and downtime reporting. Signed service-level agreement and sample service report. 12%
Installation and Training Mechanical installation, electrical commissioning, process setup, operator training, and maintenance training. A complete handover should include trained operators, maintenance personnel, safety instruction, setup documentation, and an acceptance record. Delivery ends at mechanical placement or basic power-up. Supplier includes supervised commissioning, process validation, preventive-maintenance training, and documented handover. Training agenda, attendance records, commissioning protocol, and acceptance criteria. 10%
Warranty Coverage Warranty duration, covered components, labor, travel, exclusions, and requirements for maintaining coverage. Compare warranty terms by component and service responsibility rather than comparing duration alone. Warranty excludes labor, travel, software, wear parts, or production-loss consequences without clear explanation. Warranty clearly defines parts, labor, travel, software support, exclusions, claim procedure, and recommended maintenance. Full warranty document, exclusions list, and claims-process description. 8%
Energy Consumption Installed electrical load, actual operating consumption, heating load, hydraulic or servo-system efficiency, and idle-mode behavior. Use measured or modeled kWh per production hour or kWh per kilogram of output; do not compare only maximum connected load. Only motor rating or maximum power is provided. Supplier provides operating-energy estimates for the intended material, cycle time, temperature profile, and utilization rate. Energy measurement method, test conditions, and sample production data. 10%
Maintenance Cost Preventive-maintenance intervals, lubrication, filters, seals, batteries, heaters, sensors, and common wear items. Build a five-year maintenance list with part numbers, recommended intervals, labor hours, and expected replacement costs. Maintenance schedule is generic and spare-part pricing is unavailable. Supplier provides a preventive-maintenance plan, five-year spare-parts list, and labor-time estimate. Maintenance manual, spare-parts quotation, and annual service-cost estimate. 10%
Downtime Risk Critical spare-parts availability, local service capability, remote troubleshooting, and backup procedures. Identify single-point failures and define the minimum critical-spares package before production launch. Critical parts are supplied only from a distant central warehouse with unspecified lead times. Supplier identifies critical parts, provides lead-time data, and recommends an on-site spare-parts kit. Parts lead-time report, critical-spares list, and service coverage map. 10%
Changeover Efficiency Recipe management, mold-change functions, quick-connect utilities, automatic setup, and process repeatability. Measure changeover using a defined product and mold; record elapsed time, personnel required, and first-good-part time. Changeover performance is described without a timed demonstration. Supplier demonstrates a repeatable changeover using representative tooling and provides a setup checklist. Timed demonstration, standard operating procedure, and first-article acceptance record. 6%
Controls and Data Recipe backup, user permissions, alarms, trend data, production records, network security, and integration capability. Confirm data export format, user-access levels, backup method, time synchronization, and compatibility with the planned production system. Data access depends on proprietary tools or manual transcription. Supplier documents available protocols, backup procedures, cybersecurity controls, and integration responsibilities. Control-system specification, sample data file, network diagram, and backup test. 7%
Future Scalability Software upgrades, additional automation, mold-size range, multi-machine standardization, and production expansion. Check whether the selected platform can support planned volume growth, additional auxiliaries, recipe replication, and standardized operator training. Expansion requires major hardware changes or a different control architecture. Supplier provides a documented upgrade path, compatible options, and a multi-machine standardization plan. Five-year expansion scenario, option list, compatibility statement, and upgrade pricing. 10%
Total Cost of Ownership Purchase price, installation, tooling interface, automation, energy, maintenance, training, downtime, financing, and disposal value. Calculate: Five-Year TCO = Purchase + Installation + Automation + Energy + Maintenance + Training + Downtime Cost − Residual Value. Decision is based mainly on purchase price and quoted options. Supplier provides a transparent five-year cost model with assumptions that can be independently checked. Line-item quotation, energy assumptions, maintenance plan, downtime assumptions, and sensitivity analysis. 20%

Planning note: The benchmarks above are evaluation guidelines rather than guarantees. Actual performance depends on part geometry, resin, mold design, cycle time, utilization, local labor rates, utility prices, service distance, and the final automation configuration. Request comparable test conditions and written assumptions before making a purchase decision.

Inquiry Form